

Table of Contents
- What Are Solfege Hand Signs?
- How John Curwen Created Hand Signs in the 1840s
- Each Hand Sign Explained from Do to Ti
- Chromatic Hand Signs for Advanced Students
- Why Hand Signs Work for Music Learning
- Teaching Solfege Hand Signs Step by Step
- Common Mistakes and How to Fix Them
- Movable Do vs. Fixed Do Systems
- Using Hand Signs with Classroom Instruments
- How Professional Musicians Use Hand Signs Today
- Quick Assessment: Are Your Students Ready?
Solfege hand signs are visual gestures created by John Curwen in the 1840s. Each hand position represents a different pitch (Do, Re, Mi, Fa, Sol, La, Ti, Do). The signs move from low to high, helping singers and students connect physical movement with pitch height for better music literacy.
What Are Solfege Hand Signs?
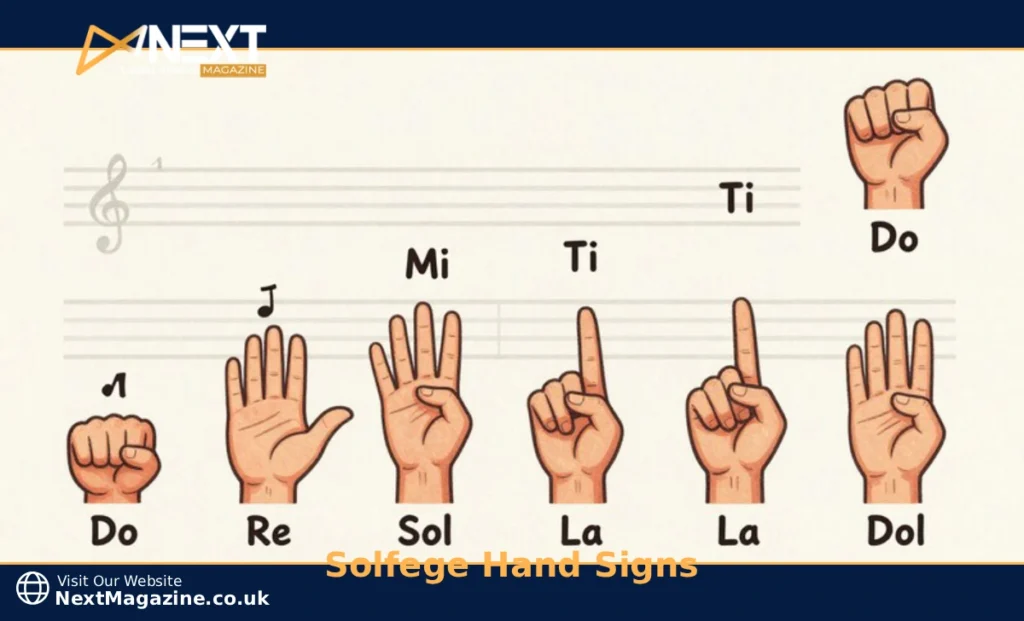
Solfege hand signs pair physical gestures with vocal syllables. Each pitch in a scale gets its own hand position. When you sing Do, you make a fist near your waist. When you sing Ti, you point your finger near your forehead.
The system creates a visual map of pitch. Students see and feel the relationships between notes. This makes abstract concepts like intervals and scale patterns easier to grasp.
Teachers use hand signs during warm-ups, sight-singing practice, and ear training. The method works with any age group, from preschool through adult learners.
How John Curwen Created Hand Signs in the 1840s
John Curwen developed his tonic sol-fa system in England during the 1840s. He wanted to make music literacy accessible to working-class people who couldn’t afford formal training.
Curwen noticed that students struggled to hear pitch relationships. Adding hand gestures gave them a physical reference point. Each hand position matches the pitch’s place in the scale.
The gestures weren’t random. Curwen designed them to reflect pitch height. Lower notes sit near the waist. Higher notes move toward the head. This spatial organization helps students internalize melodic movement.
Zoltán Kodály, a Hungarian composer and educator, later incorporated Curwen’s hand signs into his music education method. The Kodály approach spread internationally during the mid-1900s. Today, music teachers worldwide use these same gestures.
Each Hand Sign Explained from Do to Ti
Here’s what each hand sign looks like and why it works:
| Syllable | Hand Position | Height | Purpose |
|---|---|---|---|
| Do | Closed fist | Waist level | Stable starting point, feels grounded |
| Re | Flat hand angled up | Just above Do | Shows upward movement from tonic |
| Mi | Flat horizontal hand, palm down | Mid-chest | Creates stability before the half-step to Fa |
| Fa | Thumb pointing down | Above Mi | Indicates a tendency to resolve downward |
| Sol | Flat hand, palm facing you | Shoulder level | Strong, open position for dominant note |
| La | Curved hand, like holding a ball | Above Sol | Shows a connection to the upper register |
| Ti | Finger pointing upward | Near forehead | Points to resolution back to Do |
| Do (high) | Closed fist | Above head | Completes the octave, returns to tonic |
The hand signs move in a clear line from bottom to top. Students physically trace the melodic contour as they sing.
Chromatic Hand Signs for Advanced Students
Once students master the basic scale, you can introduce chromatic alterations. These handle sharps and flats within the scale.
Raised pitches (sharps) use syllables like di (raised do), ri (raised re), and fi (raised fa). The hand signs stay similar to the natural pitch but shift slightly higher or show tension.
Lowered pitches (flats) use syllables like ra (lowered re), me (lowered mi), le (lowered la), and te (lowered ti). Hand positions shift slightly lower.
Most teachers introduce chromatics only after students can confidently navigate a major scale with hand signs. This typically happens after several months of practice.
Why Hand Signs Work for Music Learning
Hand signs tap into multiple learning channels at once. Students hear the pitch, see the gesture, and feel the movement. This multisensory approach strengthens memory and understanding.
Research on motor learning shows that physical gestures help encode information in the brain. When you link a sound to a movement, your brain creates stronger neural pathways. This makes recall faster and more reliable.
The spatial organization matters too. Placing low notes near the waist and high notes near the head matches how we naturally think about pitch. We say music goes “up” or “down.” Hand signs make that metaphor literal.
Students also develop better pitch accuracy. The physical act of moving your hand to the correct position reinforces the vocal placement needed to hit the note. Your body learns the distance between pitches.
Teaching Solfege Hand Signs Step by Step
Start by introducing solfege syllables without hand signs. Let students get comfortable with the sound of Do, Re, Mi, Fa, Sol, La, Ti, Do. Sing scales together. Practice simple songs using just the syllables.
Next, add hand signs without singing. Show students each position. Let them mirror you. Practice moving from one sign to the next in order. This builds muscle memory.
Then combine both elements. Sing and sign simultaneously. Start with just three notes (Do, Re, Mi). Gradually add more as students gain confidence.
Young children (ages 4-6) can start with simplified versions. Focus on just Do, Mi, and Sol. These notes create a stable foundation and are easier for small hands to manage.
Older students and adults can move faster through the progression. They may only need a few sessions to learn all eight hand signs.
Common Mistakes and How to Fix Them
Mistake: Students hold their hands at the same height for different notes. Fix: Stand in front of them and model correct positioning. Use visual cues like tape marks on the wall at different heights.
Mistake: Hand positions don’t match the traditional Curwen gestures. Fix: Practice hand signs without singing first. Focus on the shape and placement until it becomes automatic.
Mistake: Students forget to move their hands up and down with melodic contour. Fix: Start with slow, exaggerated movements. Trace the melody in the air before adding pitches.
Mistake: Tension in the shoulders and arms from holding positions too long. Fix: Remind students to stay relaxed. Hand signs should feel natural, not rigid.
Movable Do vs. Fixed Do Systems
Most teachers in the United States use movable do. In this system, Do is always the first note of whatever major scale you’re singing. If you’re in G major, G is Do. If you’re in D major, D is Do.
Movable do emphasizes the relationships between notes in a scale. Students learn interval patterns and how melodies move within a key. This approach works well for sight-singing and developing relative pitch.
Fixed to assign each syllable to a specific pitch regardless of key. C is always Do, D is always Re, and so on. This system is common in European conservatories and among instrumentalists.
Both systems work with hand signs. The gestures remain the same. What changes is how you apply them to different keys.
For most beginning students and classroom settings, movable do is more practical. It helps students understand music structure without getting bogged down in note names.
Using Hand Signs with Classroom Instruments
Hand signs pair naturally with color-coded instruments like boomwhackers and handbells. Many of these tools use standard colors for each pitch:
- C (Do) = Red
- D (Re) = Orange
- E (Mi) = Yellow
- F (Fa) = Green
- G (Sol) = Light Blue
- A (La) = Dark Blue
- B (Ti) = Purple or Pink
Students can match hand signs to instrument colors. This creates another layer of reinforcement.
Start with simple songs that use just a few notes. “Hot Cross Buns” uses Mi, Re, and Do. “Mary Had a Little Lamb” uses Mi, Re, Do, and Sol. These are perfect for beginners.
Have students sing with hand signs first. Then transfer the melody to instruments. This sequence helps them internalize pitch relationships before adding a new skill.
You can also create call-and-response activities. Sing a short pattern with hand signs. Students echo on their instruments. This builds listening skills and pitch-matching ability.
How Professional Musicians Use Hand Signs Today
Choir directors use hand signs during warm-ups to focus attention on pitch accuracy. The visual cues help singers adjust tuning in real time. If someone’s flat, the director can point to the correct hand position without stopping the rehearsal.
Music education programs at universities include hand signs in aural skills training. Students learn to sight-sing complex melodies by combining solfege syllables with gestures. This prepares them for professional work in teaching or performing.
Some contemporary a cappella groups use hand signs during rehearsals. The method helps when learning intricate harmonies without instrumental accompaniment. It gives singers a shared language for discussing pitch relationships.
Elementary and secondary music teachers rely on hand signs as a core teaching tool. The Kodály approach, which incorporates Curwen hand signs, is one of the most widely used music education methods in North America.
Quick Assessment: Are Your Students Ready?
Use this checklist to gauge progress:
Beginner Level:
- Can sing Do, Re, Me in tune
- Recognizes hand signs when you model them
- Can mirror simple patterns (Do-Re-Me, Me-Do-Re)
- Moves hands up and down with pitch direction
Intermediate Level:
- Sings the full major scale with correct hand signs
- Identifies solfege syllables when shown hand signs
- Creates simple melodies using hand signs independently
- Maintains accurate pitch while signing
Advanced Level:
- Uses chromatic hand signs for altered pitches
- Sight-sings from notation using solfege and hand signs
- Teaches hand signs to peers or younger students
- Applies hand signs in minor keys and modes
Students progress at different rates. Some need weeks to master the basics. Others move quickly through all levels. The key is consistent practice and patience.
If students struggle with pitch accuracy, spend more time on audiation (hearing music internally before singing). Hand signs support this skill, but don’t replace it.
If students forget hand positions, increase visual reinforcement. Post a chart in your teaching space. Review positions at the start of each session.
Most students who practice regularly show measurable improvement within 6-8 weeks. They’ll sing more in tune, recognize intervals faster, and sight-read with greater confidence.
Hand signs aren’t a magic solution. They’re a tool that works when combined with good teaching, regular practice, and active listening. But for students who think spatially or learn best through movement, hand signs can transform how they understand music.

Joseph Walker
Joseph writes about resilience with the steadiness of someone who's watched people close to him rebuild from very little. His tone stays even and unsentimental, even when the subject matter isn't. He's more interested in the quiet, unglamorous work of starting over than the dramatic comeback stories people usually tell.
View all articles →Get the Weekly Brief
The best guides and stories, delivered every Sunday.